Tuesday, December 29, 2009

Base Period Body Weight

During the Transition period after your last race season you probably gained some weight. That is expected. And it’s probably a good thing - depending on how much weight you gained. Trying to stay at your optimal race weight year round is not good for your health. It’s also not good for your psyche. Staying focused on maintaining race weight 12 months of the year, regardless of your training load, requires a monk-like lifestyle of continual sacrifice and near suffering.

So I hope you’ve enjoyed life a bit and gained some weight in the last few weeks. The Base period is the time to start trimming down any excess beyond your best training weight. Training weight is a bit heavier than race weight. Your training weight by the end of the Base period may be roughly three to five percent more than your race weight – the weight you will have on the day of your first A-priority race. The higher workload of the Build period should be enough to gradually bring your training weight down to your racing weight by race day.

The extra calories you are burning as you move into the Base period may be enough to help you accomplish this initial weight loss. If not then you need to become more aware of your eating habits and modify them appropriately. Keeping a food log is a proven way of doing this.

Athletes who have been through this weight-loss process before generally know what they need to do to shed the extra flab. What I have found works best with the athletes I’ve coached is to greatly reduce their intake of starch and sugar replacing these foods with non-starchy fruits and vegetables. Examples of starchy foods are pastries, cereal, bagels, bread, corn, rice and potatoes. Limit your intake of such foods to the first 30 minutes following your long aerobic endurance and higher-intensity muscular endurance workouts. This will compromise your recovery a bit, but it’s better to do that now than in the last few weeks before your A race when recovery is becoming increasingly important to race performance.

Labels: , , ,

Monday, December 28, 2009

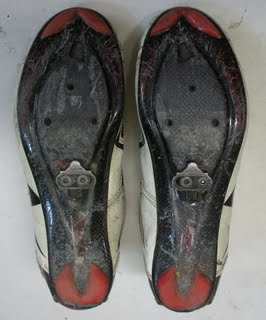
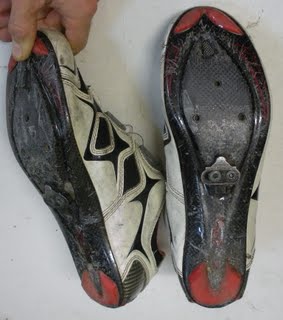
More Custom Midsole Cleats

Here's another picture of a reader's custom midsole cleat position. The athlete is Ramon Alarcon and the shoes are Specialized. His comments follow.

Attached are a couple of pictures of a pair of 2007 Specialized S-Works Road Shoes that I modified to work with the midsole cleat position. In one of the pictures, you can see that because of the shape of the sole, I had to build up the platform to provide a load bearing surface for the cleat. I used a slow setting epoxy to build up this platform below the cleat. So far, I've put about 5k miles on the shoes with no problems.

The reason I chose to try the mid-sole position is due to a medical condition. In 2008, I was diagnosed with Exercise Induced Arterial Endofibrosis. For those who don't know about it, it's a narrowing of an artery located in the hip caused by repeated motion under load. The artery in question supplies blood to the leg. Basically, the millions of times your hip flexes while cycling can cause this condition under certain circumstances. This limitation in blood flow was not a problem during moderate training, but it was causing cramping in the quads and possibly calves during intense efforts during races. When I first read about the mid-sole position, I figured, hey, if my blood flow is limited, why would I direct any to supply the calves that aren't needed to move the bicycle forward. Since switching to the mid-sole position, I have had no cramping problems in races. I still notice a drop in power due to the blood flow limitation, but it seems like the mid-sole position has minimized this. I have been able to reach about 96% of the FTP I had before the diagnosis.

One final note. I have my EIAE monitored through regular testing. It has been stable for a year. For the sake of further investigation, my doctor had me participate in a test to measure Popliteal Artery Entrapment. It turns out that, even though I'm not a runner, I have that too. A fairly large percentage of the population may have this. It seems to me that the mid-sole cleat position would provide a benefit to cyclists, especially those who also run, and are thus more prone to developing this condition.


If you use midsole cleats and wouldn't mind sharing a picture of them and any comments on how they've helped you (or not) please send it to me by way of email. So far I've not heard from anyone who found this position to detract from performance. I'd like to see those comments also, especially if you have a sense of why. But there must be an accompanying picture of the shoes you used. Be sure to give me permission to use your picture, comments and name (it's ok if you prefer anonymous). Thanks!

Labels: ,

Saturday, December 26, 2009

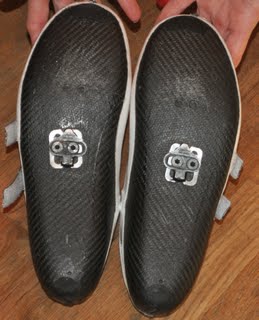
Another Midsole Cleat

A few days ago I suggested that if you use bike shoes with a midsole cleat you could send me a picture. I'll post some of them. Here is one from reader Jill Fry along with her comments (posted with her permission). The shoes appear to be Biomac with custom cleat placement. Biomac shoes are described here. Here are Jill's comments on her shoes:

I got these in Oct of this year. Riding in these shoes is NOTHING like riding with the cleats pushed back, completely different feel. My first ride out I was really worried about whether or not I was going to like them, they felt so different. I stuck with it , kept riding in them and after a while they felt 'normal' to me. One of the hardest things to get used to was clipping in! I notice a huge difference in the amount of work my calves are doing when I ride especially on the hills, I feel like they’re hardly working . An Achilles injury that I had been trying to get rid of for months went away within a couple weeks after I started wearing these shoes. I had taken a considerable amount of time off so I didn’t put my power meter on the bike when I first started riding. With all the time off I don’t think comparing with old data would have told me anything . I just started riding with the power meter again, it will be interesting to see the numbers once I get my fitness back and start racing again.

Labels: ,

Wednesday, December 23, 2009

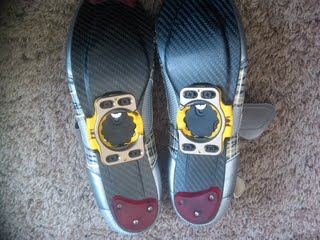
Custom Midsole Cleats


Jim Vance, a pro triathlete who uses midsole cleats, just got his new D2 custom-made shoes. I thought you might like to see what they look like. This is a Speedplay pedal system with a 4-bolt cleat. If you have midsole cleats please send me a picture like this one. I'll post some of them here. Here is my email contact.

Labels: ,

Monday, December 21, 2009

How to Modify Shoes for Midsole Cleat

The first blog I ever posted nearly two years ago is still the most read. The subject was Cleat Position. That post has led to many questions on how to modify an old pair of cycling shoes in order to give it a try. I got another such query this week so it's probably time to explain how with a stand-alone post to save answering this question so frequently.

And to answer another common question on this topic: Yes, I do still use midsole cleats and have seen many others try it with good results, also.

If you decide to modify an old pair of your shoes you will more than likely need to use a mountain bike pedal with a two-bolt cleat as the arch area of most cycling shoes have a bit of a concave curve. That means there would be a gap between the middle of the cleat and the shoe if you used a three- or four-bolt cleat.

Here's how to modify your shoes. The pictures are of an old pair of Shimanos I changed over several years ago.

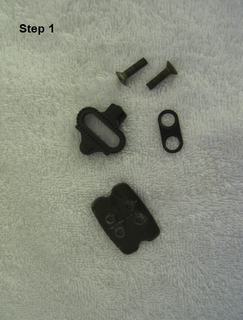
Step 1. Go to your local bike shop and in addition to mountain bike pedals and cleats get T-nuts and longer bolts than come with the cleats. Here is a picture of the parts you need. The T-nuts may be two, separate nuts instead of one, four-hole nut as shown here.

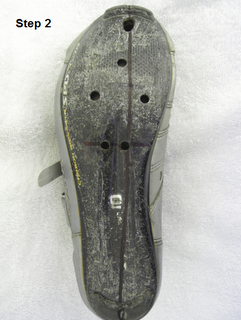
Step 2. After removing the old cleat draw a straight line from the middle of the toe of the shoe through the middle of the heel as shown in the picture. Measure to find the midpoint of that line and draw a second line perpendicular to the first.

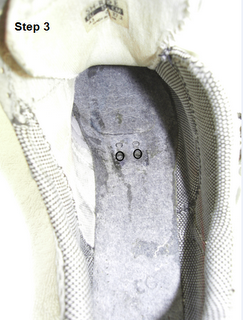
Step 3. Drill two holes on the second line that are spaced appropriately for your cleat and centered on the shoe widthwise. This is the tricky part. It's a good idea to check your measurements again before drilling. The picture here shows those holes from the inside of the shoe with the insole removed. This shoe happens to be smooth on the inside. That makes it easy. My wife's shoes had a recessed pattern of reinforcing squares which had to trimmed in order to insert the T-nuts.


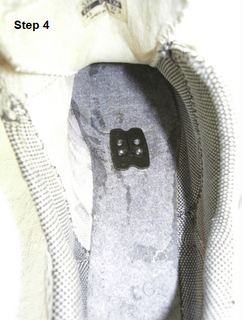
Step 4. Insert the T-nuts as shown here from the shoe's inside.

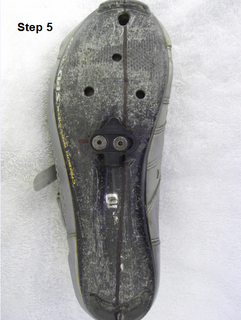
Step 5. Mount the cleats. Most of these two-hole cleats are adjustable for medial-lateral positioning as shown here. But I've seen some that aren't. If you can't slide it from side to side a bit then the position of the holes becomes even more critical. You could wind up with your feet too wide or too narrow once clipped in. So it's best to get cleats that are adjustable.

Be aware that with a midsole cleat you are likely to have a considerable overlap of the shoe with the front wheel. This makes slow turns a bit dangerous. If your shoe touches the wheel during a turn you may fall. You will eventually get used to this and learn to make slow turns with your outside foot out of the way of the wheel.


Also be aware that by drilling holes in the arch area you may well weaken the construction of the shoes to the point that they break under pressure when sprinting. The more massive the sole construction the less likely this is to be a problem. Thin-soled shoes should not be drilled. I'd suggest using the modified shoes with some caution as you gradually adapt to the new position. Ultimately, if you like what you find, you will want to get a pair of custom-built shoes with a midsole cleat. Perhaps some day a manufacturer will offer such a shoe so you can purchase them off the rack. But for now that is not an option.
Your position on the bike will need adjusting for a midsole cleat. The saddle will need to be lowered and adjusted fore-aft depending on a number of variables such as how steep or relaxed the seat tube is and how big your feet are. You may also need to adjust the handlebars for height and reach after the saddle is set. I'd highly recommend seeing a professional bike fitter to get this done right.

Labels: ,

Thursday, December 17, 2009

Force Training

In the last several posts I've described various aspects of Base-period training including aerobic endurance, speed skills for cycling, and speed skills for running. Now I'd like to discuss a third Base-period ability - force.

The main message here is this: Endurance athletes who are deficient in force will never fully realize their capacity to swim, bike or run fast because they lack power. You also need power to climb hills and plow through rough water. Having a good level of force, the ability to overcome resistance (such as gravity or drag), is a critical aspect of power. Let’s examine power from a physics perspective and then tie it into our world of endurance sport.

In physics, power is defined as work divided by time. I’m sure you know what time is, but what is “work”? Work is force multiplied by the distance moved. Huh? Ok, let’s try to get a handle on this by thinking about riding your bike.

If you choose a high gear, something such as 53t x 14t, the bike travels a relatively long distance on every, single revolution of the pedals. Had you chosen a lower gear such as 39t x 18t the bike would not go as far on one turn of the cranks. So a higher gear means a greater distance traveled. That’s the “distance moved” part of the power equation.

If you are in that high gear it takes a lot of muscular force to drive the pedal down. That should be obvious. When you are in a 53t x 14t you have to push harder than when you’re in a 39t x 18t. (This, of course, assumes a lot of things such as you are on the same section of road with the same wind both times.) That’s a second part of the power equation – “force.”

The last part is “time.” This is how long it takes you to turn the pedals through one, complete revolution – from the 12-o’clock position back to 12-o’clock. A high cadence means you are turning the cranks fast so the time of one revolution is brief. A low cadence means the revolution time is long.

So the application of this equation is that the way to have great power on the bike is to have the capacity to drive a big gear at a high cadence. It’s the same for swimming and running only now we are talking about stroke or stride length instead of gear size. The bottom line is that you can go faster by increasing force or distance – or both. You can also go faster by decreasing time. This means a higher cadence, or higher stroke or stride rate. I explained stride rate in the last post on running speed skills. Any of these three changes will make you faster. In the next post (when I get some time again - more travel on the way) I will introduce the process I use to improve force in order to help the athletes I coach become more powerful. The key to force is greater strength in the muscles that you use in your sport.

Here's the short message for where I am going with this: There are two training routes to improving your muscles’ ability to produce force. The first is resistance training in the gym. The other is the sport-specific development of force while swimming, biking or running. I like to have athletes start with a short, resistance-training phase in the early Base period and then switch over to sport-specific training in the mid-Base period while maintaining the gains made in the weight room. While resistance training is not the same thing as swimming, biking and running, it gets your muscles ready for the sport-specific phase which is where the greatest gains are eventually made.


I hope to follow up on this with details in a few days. Check back soon.

Labels: , , ,

Sunday, December 13, 2009

Running Faster

There’s a good chance you can lower your running times by simply refining your running skills. Speed skill is so important to running that I have the athletes I coach do drills and other skill-enhancing workouts every week throughout the year. The skills that need mastering are simple and few.

Biomechanically, there are only two things you can do to run faster. You can run with a faster cadence or you can run with a longer stride. The fastest runners in the world, such as the Kenyans, do both of these. The place for you to start in improving your running efficiency is with cadence. Let’s examine how you can do that.

The next time you go to a race or watch one on TV check the cadence of a few select elite runners. To do this count every time a runner’s right foot strikes the road for 20 seconds and then multiply by three. The Kenyans are running at a cadence of 94 to 98 even late in a long race such as a marathon. The others generally have a cadence of 90 to 94. So the only way these lower-cadence runners can keep up with the Kenyans is to lengthen their strides. That’s inefficient because it produces a bit of vertical oscillation. They bounce up and down just a slight bit too much. And since the finish line is in a horizontal plane, energy expended vertically is mostly wasted.

Count your cadence the next time you are out for a run. If you’re like most age group triathletes it will be in the range of 76 to 86. And the slower an age grouper runs the lower their cadence becomes. Elite runners tend to keep their cadence about the same even when running slowly. They’ve trained their nervous systems to fire at a set rate which isn’t appreciably altered by pace.

Besides reducing vertical oscillation, running with a higher cadence means the foot spends less time in contact with the ground. That means running faster. Until your foot comes off the ground you aren’t going any place. It’s like an anchor.

So let’s work the other direction now – from foot contact time back up the chain to cadence – to see how we can improve your running times.


To minimize foot contact time you need to reduce the angle at which your foot comes in contact with the road surface. If you land on the heel with your toes pointing skyward at about a 30-degree angle, which is common for slower runners, it will take a relatively long time for the foot to be lowered to the pavement and then to rock forward and finally come off the ground at the toes. This will take only a few more milliseconds than had you put your foot down flat on the pavement and then toed off. But those extra milliseconds for each footstrike add up by the finish line.

It’s alright to have a slight heel-first contact with the road. But it should be so slight that someone you’re running at would not be able to see the bottoms of your shoes. You can check this for yourself by having that person shoot a video of you running at the camera. Do you see black soles? If so, you have an exaggerated heel strike. Minimizing it will speed you up.

How can you learn to minimize heel strike? Or, to put it another way, what causes you to land on your heel with your toes high off the ground? The answer to this latter question has to do with your knee. The only way to land on your heel is to lock, or nearly lock, your knee out straight. This is what you would do if you were running fast and trying to stop abruptly. You would straighten your knee and land on your heel. So running this way is like running with the brakes on. No wonder it slows you down.

The fastest way to experience flat-footed running is to run with your shoes off. Shoes with their often thick, rubber heels seem to be saying to us, “land here.” As soon as you take them off you’re back to the way our ancient ancestors ran on the grassy plains of Africa. We’re also running the way the Kenyan kids learn to run – without shoes.

I have the triathletes I coach do a drill called “strides” almost every week in the Base period. If they can do this without shoes, all the better. Often they can’t because snow and cold weather in a winter Base period make this impractical. But whenever they can they are encouraged to do this drill shoeless. This may be on a treadmill during the winter. Another option is to do this drill in “water walkers” – light, slipper-like shoes that fit snugly around the foot and are designed for the beach. (Be careful at first not to do a lot of barefoot running initially as you may well develop tender tendons as your feet and legs adapt.)

The strides drill is simple. Go to a park or other grassy area that has a very slight downhill grade of about one percent for 150 yards or so. Warm-up for 10 to 15 minutes. Then take off your shoes (or put on the water walkers) and run down the hill for 20 seconds. Do this six to eight times in a session. This should be a fairly fast run, but you could go much faster. In other words, hold back just a little bit. Focus on a flat-footed landing with the knee slightly bent. Count every time your right foot strikes the ground. Your goal is 30 to 32. That’s a cadence of 90 to 96. Don’t try to go above 96. Note a landmark where you completed the 20-second stride. If you start at the same spot for each stride, during the workout, as you warm up even more, you’ll finish farther down the course indicating that your stride is also getting longer since cadence remains steady. You’re now running like a Kenyan.

Now for the hard part of the drill – at least for most type-A triathletes: Turn and walk back to the start point. Fatigue is the enemy of skill development. Walking will make sure you aren’t fatiguing as the workout proceeds.

As your fitness improves you can insert drills into the walking portions. Start by doing skips as you did when you were a kid. Do 50 total skips on the recovery. This will further ingrain the flat-foot, slightly knee-bent landing. Later in the Base period do these skips for height. How high can you skip? Skipping for height builds power in your legs which in turn increases stride length – without even trying.

When out for your normal Base training runs occasionally check your cadence. Try to raise it by two or three RPM. This will feel awkward at first, as if you are running with baby steps. And your heart rate will probably rise even though you aren’t going any faster. It will take a while for your nervous system to adapt to a higher cadence. During this time you may seem to be going the wrong direction. That’s common and necessary if you are to eventually run faster as your body adapts. Hang in there.

Labels: , , , ,

Another Pedaling Workout

Here's one I forgot about for improving your pedaling skills. If you have a favorite drill not listed here please let us all know in a comment.

Mountain biking. This isn’t a drill, but riding a mountain bike off road on hilly courses is good for improving pedaling skills. When you ride a mountain bike up a steep hill on a loosely packed surface such as dirt or gravel you must learn to keep even tension on the chain. If you mash the pedals the back wheel will slip and you won’t make any progress. Learning to keep even tension on the chain is just another way of saying learning to pedal smoothly and efficiently.

Labels: , ,

Saturday, December 12, 2009

Pedaling Drills

One of the goals of the Base period is to improve your speed skills - the unique techniques of your sport. At first these are learned by isolating them and making the movements slowly. As the movement pattern becomes ingrained the movement becomes faster and more complex as it is combined with other critical movements.

Pedaling a bike seems like it ought to be simple and require little in the way of skill. That's not the case. In any group ride look around and you can pick out the riders who have good pedaling skills and those with poor skills. Efficiency - how much energy is wasted (or not) - is what this is all about.

Athletes who are efficient at pedaling a bike are especially good at the top, bottom and recovery side of the pedal stroke. At the top they transition efficiently from pedaling up and back to pedaling forward and down. At the bottom of the stroke they do just the opposite without wasting energy. Riders who are not very good at pedaling make these transitions too late. This wastes a tiny amount of energy in every stroke. In one-hour you may make 5,000 to 6,000 pedal strokes. That is potentially a lot of wasted energy.

Efficient cyclists slightly unweight the pedal on the recovery side, or backside, of the stroke. Inefficient riders let the foot and leg on the recovery side rest on the pedal causing the other leg, the one driving the pedal down, to work harder to lift the dead weight of the recovery leg. Again, this wastes a lot of energy.

Note that I’ve not said anything about the front side of the pedal stroke. This side is easy to get right. Pushing the pedal down does not require much in the way of skill. The problem is that inefficient riders focus only on the down stroke. They “stomp” the pedals typically with a lot of excess, side-to-side, upper body movement. This also wastes a tremendous amount of energy.

Let’s get rid of the energy wasters in this Base period. Drills will help you to pedal better. Following are the common ones I use with the athletes I coach. They may be mixed together in a single workout or each may be done by itself as a workout.

* Isolated leg training (ILT) drill. This is the quintessential pedaling drill, the one you should do a lot in the early weeks of Base. It’s done on an indoor trainer. Unclip one foot and rest it on a chair next to the bike so you are left to pedal with only one leg. With the bike in a low (easy) gear turn the crank at a comfortable cadence. The first thing you’ll notice is that getting through the top of the stroke, the 12-o’clock position, is difficult. Focus on smoothing this top transition. At first you may only last a few seconds before the hip flexors fatigue. When that happens switch to the other leg. When it fatigues clip both feet in and pedal for a few minutes applying what you have learned in the single-leg pedaling. Repeat the drill several times throughout the workout. A variation on this drill involves using Power Cranks™. These are cranks like the ones you have on your bike now, except they aren’t connected. So each leg pedals individually. If you get these it’s best to mount them on a spare bike so you don’t have to change crank arms when you want to do different workouts.

* Toe touch drill. In this mind drill you focus on your feet. Every time your foot approaches the top of the stroke imagine that you can push your foot forward in your shoe touching your toes to the front end of the shoe. Of course, you won’t be able to do this, but trying will cause you to transition more smoothly through the 12-o’clock position. Pedal in an easy gear going slowly as you learn how to make this movement. As you master the drill you’ll be able to turn the pedals faster.

* Top only drill. This is another foot-focused drill. Pedal the bike by keeping the top of your foot in constant and firm contact with the inside, top of the shoe. Try not to push down on the pedal at all. The actual pedaling is done just with the upstroke. Don’t apply excessive upward force. Make the pedaling movement gentle and smooth.

* 9-to-3 drill. As you pedal the bike imagine that you can drive the pedal forward from the 9-o’clock position on the backside to 3-o’clock on the front side of the stroke without going through 12 o’clock. Keep the gearing low so that you can pedal easily.

* Spin-up drill. During a ride shift to a low (easy) gear and gradually increase your cadence higher and higher until it is so fast that you begin to bounce on the saddle. Then return to a normal cadence. It should take 30 seconds or so for each “spin-up.” The bouncing is because you have reached and gone slightly beyond your optimal high cadence. You bounce because your foot is still pushing down at the bottom, six-o’clock position, of the stroke. And since the crank arm can’t get any longer, as you push down your butt comes off of the saddle. This drill is best done with a cadence meter on your pedal so you know what your top-end cadence is. The goal is raise your highest, optimal cadence by learning to transition smoothly at the bottom of the stroke.

* High-cadence drill. Throughout a workout insert high-cadence intervals of a few minutes each. During each of these intervals increase your cadence to a level which is just slightly uncomfortable and then maintain it for the length of the interval. Use a low (easy) gear. Recover between the intervals for several minutes while pedaling at your normal cadence. Over the course of several weeks extend the duration of each interval and the combined interval time for the workout.

* Fixed-gear drill. This requires special equipment – a fixed-gear bike. Your local bike shop can help you set up such a bike. This is a bike that has only one chain ring, one cog and no derailleurs or freewheel. When the wheels go around the pedals also go around. You can’t coast. When riding a fixed gear you must learn to relax and let the bike do the work. The first few times you ride it go to some place flat with no traffic and no stop signs. A large parking lot would be perfect. Keep the workouts short at first. Be forewarned that this is a dangerous workout until you master riding the “fixie.”

Labels: , , ,

Wednesday, December 9, 2009

Ooops - Forgot to Add This

Just posted but forgot to mention that I'll be doing a free webinar for TrainingPeaks.com on the annual training plan next Tuesday. Go here to register.

Labels:

More Thoughts on Base Period

I often see comments posted on my blog and receive emails from athletes implying that the Base period should be a time of very low intensity. Some seem to believe that is what I have athletes I coach do. That's really not the case.

This sort of training was called long, slow distance back in the 1970s when it became popular with road runners. It may actually be of some benefit for that sport since running even at very slow speeds is somewhat stressful. If runners were to walk for LSD training they'd be doing something akin to riding a bike or swimming very slowly.

There's not much to be gained for the serious athlete by a winter of noodling along at low effort in zone 1. This sort of low intensity is best for recovery, not for improving fitness. When the effort is down around 50% of VO2max then little is happening to boost cardiovascular or muscular development. The way to do that is to lift the intensity a bit. In recent posts here, here and here I've tried to explain that. But some how the message doesn't seem to be coming across as I expected it would.

As explained in the posts linked above, zone 2 is necessary to boost aerobic endurance. Going very slowly for a long time in zone 1 just won't do it. To improve your speed skills you need to include some very fast-paced swims, bikes or runs for a few seconds at a time with long recoveries. To build force also requires very brief episodes of high effort and long recoveries. And muscular endurance improves with moderate to moderately high intensities such as zones 3 and 4.

So winter is not a time to just cruise along taking in the sights and singing to yourself. Nor is it a time when you should be doing relatively long, high-intensity, anaerobic endurance intervals or fast-paced group workouts that are mini-races. (This assumes, of course, that you have a few months until your first A-priority race of the new season. If you've got an important race in February then high intensity now is the way to go.)

As I told one of my client-athletes yesterday, building fitness is like building a house (my father was a carpenter and sometimes it shows up in how I see the world). The foundation and framework (Base training) must be built carefully and diligently. Everything you do later in the construction depends on this. Training at very hard intensities (zone 5 with lactate/hydrogen accumulation) now is like starting to build the house by doing the finish work first and skipping the foundation and framework. It's not very effective.

So train with some moderate intensity - just don't overdo it. Save the zone 1 stuff for days when you need to recover from harder workouts.

Labels: , , , , , ,

Monday, December 7, 2009

The Gift of Fitness

It was a busy weekend so I didn't find time to post anything. But there are a couple of ideas I've been toying with in my head and should have something up soon. In the mean time, a brief comment to help pay the bills...

Looking for a present for the athlete in your life? How about 3 months of coaching by one of my TrainingBible coaches? This is something nearly every athlete would love to receive as a gift to help them get ready for the 2010 season. Make your purchase before December 25 and TrainingBible will even give you a gift - we will waive our normal $150-250 Start Up Fee (with 3 months paid in advance). This offer is good for any of our coaching services. For a list of services and fees go to my site. To take advantage of this offer please email our Director of Coaching, Adam Zucco before December 25, 2009.

Labels: ,

Friday, December 4, 2009

Thoughts on the Base Period

All of the athletes I coach are now in their early Base periods. So I've been talking with them about why this period is so important. Here's the gist of what these conversations have been about.

In many ways Base is the most important training period of the entire season. If it goes well you will be able to train at a higher level in the following periods. If it doesn’t go so well you won’t be able to train to your limits later on in the Build period and you’ll be more likely to break down due to overtraining, illness and injury.

Training in the Base period has been compared with laying the foundation for the construction of a house. Build a solid foundation and the house will be sound and free of cracked walls and sagging corners. Do a very poor job of constructing the foundation and the house is likely to collapse as it is stressed by harsh conditions.

The Base period has also been described as being like an Egyptian pyramid: The broader the base of the pyramid, the higher the peak that can be built on it. I've always liked this analogy.

However you like to think about it, the bottom line is that the Base period is when you construct your season. Everything you do after this period is dependent on what you accomplish now. It’s certainly not an 'off season' in the sense that it is relatively unimportant. This is a time that is critical to your success later on. You need to have defined objectives for the Base period and a training plan for accomplishing them. The higher your goals are for your racing this season, the more important clear objectives and a plan become.

The biggest mistake athletes make in the Base period is by-passing the basic-ability workouts that should be done in order to get to the truly hard sessions of the Build period such as high-intensity intervals, anaerobic hill repeats and 'racing' with training partners. Athletes commonly skip the Base period because the workouts seem too easy. They come to the conclusion that they aren’t working hard (read 'intensely') enough. If that happens and you cut out Base training, your fitness will not be as great later on as it would have been following several weeks of laying down a solid foundation.


There are four 'abilities' I strive to improve in the Base period for the athletes I coach: aerobic endurance, speed skills, muscular force and muscular endurance. The last of these is dependent on the previous development of aerobic endurance and muscular force so is delayed until later in the Base period. These are described in my books.

The bottom line for the serious athlete: Know what it is you must accomplish in the next few weeks, develop a plan and follow it closely.

Labels: , , , , ,

Tuesday, December 1, 2009

The Aerobic Base Ride - More


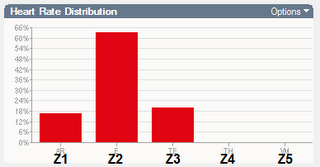
This is just a quick addendum to the post I made yesterday on the subject of the aerobic base ride. In that post I commented that your heart rate should stay primarily in zone 2. This allows you to complete a long, steady endurance workout that boosts aerobic fitness. One of the athletes I coach did such a ride yesterday. Here you can see a chart which shows how his heart rate was distributed by zones. This is an excellent example of what the heart rate distribution should look like after such a workout.

Labels: , , ,